3D Printing

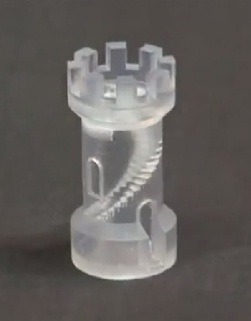
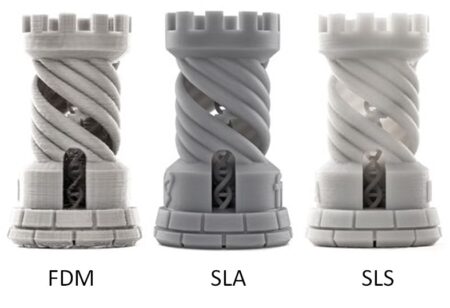
Way back when I was an itty bitty boy, I remember reading about rapid prototyping, and seeing pictures of objects created from an SLA printer. The object I remember most was a rook with an internal spiral staircase. Was was amazing about it is that it is an object that would be impossible to injection mold, or carve using a CNC machine. It had amazing detail for such a diminutive object.

When I went to college, we had a pair of powder bed printers that we could use in our manufacturing laboratory. Powder bed printing is extremely versatile because the objects being printed do not require any support structures. This allows for flexibility in design that could be difficult to achieve otherwise.

Since graduating, there has been an at-home 3D printing boom. I recall when the MakerBot went mainstream. It was very interesting, but I was very put off by the quality of the prints. The filament left a very jagged surface, there wasn’t a ton of detail, and the few prints I had seen in person had de-lamination issues in some of the layers. I’ve been very skeptical of filament printers since.

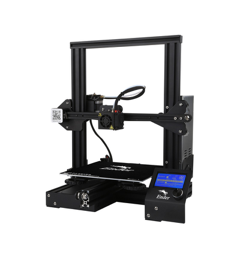
I finally gave in after seeing some prints a friend at work made using his printer. The prints still have the trademark layer lines of a filament printer, but the detail has improved so much. I got a Creality Ender 3 ($260 at time of writing) which seems so incredibly cheap. I am extremely impressed with what this machine can do.

Setup

The printer comes unassembled. It took about 30 minutes to put it together. It really required very little skill, as long as you know how to turn an Allen wrench.

Once it is assembled, the next thing to do is level the bed. This is accomplished with 4 knobs underneath the print bed. Again, it’s a pretty basic process.

Lastly, feeding the filament is a simple task. After that, it’s ready to print.

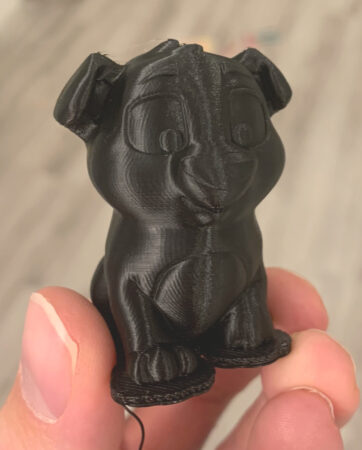
The first print I did was preloaded on the thumb drive. It was a little dog figurine. It printed perfectly!

Software

The printer came with it’s own branded software. Unfortunately, it is Windows only, but off the bat I was impressed by the ease of use. I’ve never seen or used slicing software before, but I was delighted by how intuitive and easy it is to use. It has basic presets as well as expert settings. For most things, the basic presets are great. I’ve used them for multiple projects without any real issue.

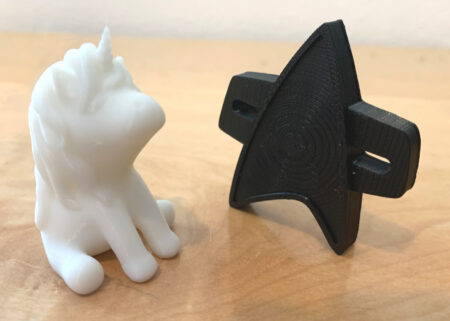
Replacement spool holder for a tape dispenser; Modeled in Fusion 360, Set up in slicer, printed in white PLA

I did eventually find out about Utilimaker’s Cura and downloaded it so I could slice on the Mac, and also so I could test tree supports. Cura had a built in printer profile for the Ender 3, which was great. My first few prints using it for slicing have also been a success.

Printing

Now, it’s not all great. I’ve had my share of failed prints. Many times this is do to positioning something sub-optimally, or trying to print something that’s just too small and delicate. In most cases I’ve been able to work around it by rotating or splitting the object up. Another issue I’ve had is with smaller items sticking to the print bed. Adding a raft certainly remedies these issues, however it uses a lot of extra material.

I did buy an upgraded glass print bed. The plastic mat that came with the printer already had visible signs of wear after just a month or two. The glass bed has been performing pretty well, The adhesion is good, and it seems to be resistant to wearing. I still have problems with larger prints pulling up around the base edges though.

Conclusion

I’ve always steered away from FDM printers because of their inherent drawbacks, such as requiring supports and the inherent layered texture of the printed piece. Despite all those misgivings, I am quite pleased with this product, and equally with it’s affordable price. One thing to be weary of though, I’ve found that with this hammer in my tool chest, most of my problems have started to look like nails.

Project Euler 117

I enjoy solving Project Euler problems in my downtime. Problem 117 is one that I’ve looked at multiple times, but never came up with a good solution. The premise is easy enough, but, as with most Euler problems, the scale of the problem presents issues.

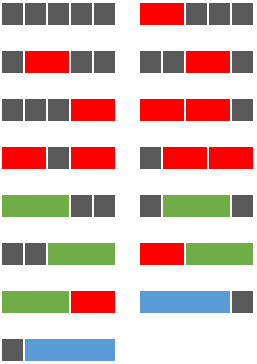
Using a combination of grey square tiles and oblong tiles chosen from: red tiles (measuring two units), green tiles (measuring three units), and blue tiles (measuring four units), it is possible to tile a row measuring five units in length in exactly fifteen different ways.

How many ways can a row measuring fifty units in length be tiled?

For the context of my solution, I am representing the tiles as an array or list of integers that each represent the length of a tile. For example, (1, 3, 1) would be a black, green, and black tile taking up a total of 5 spaces.

Brute Force sometimes works on these problems, but more often than not, they take far too long to complete. I don’t feel like I’ve “solved” one of these problems if the solution takes more than a second or two. My first naive attempt to solve this problem was to attack it recursively and build all the combinations of tiles. After letting it run for a few minutes, I gave up and assumed there must be a better way.

While building each tile combination was prohibitively time consuming, I found that I could still use recursion to get the base combinations for the tiles. There are only about 1000 of those, so the trick will be permuting them to get the full count. Well, as it turns out, this led to a few more problems.

Using the permutations tool provided in itertools proved to be too slow as well. First of all, it was finding too many solutions. For example:
>>> for i in list(itertools.permutations([1, 1, 2, 2])): print i
...
(1, 1, 2, 2)
(1, 1, 2, 2)
(1, 2, 1, 2)
(1, 2, 2, 1)
(1, 2, 1, 2)
(1, 2, 2, 1)
(1, 1, 2, 2)
(1, 1, 2, 2)
(1, 2, 1, 2)
(1, 2, 2, 1)
(1, 2, 1, 2)
(1, 2, 2, 1)
(2, 1, 1, 2)
(2, 1, 2, 1)
(2, 1, 1, 2)
(2, 1, 2, 1)
(2, 2, 1, 1)
(2, 2, 1, 1)
(2, 1, 1, 2)
(2, 1, 2, 1)
(2, 1, 1, 2)
(2, 1, 2, 1)
(2, 2, 1, 1)
(2, 2, 1, 1)

When in reality many of those are equivalent in the terms of the problem conditions. What we want is a set which looks more like this:
>>> for i in set(itertools.permutations([1, 1, 2, 2])): print i
...
(1, 1, 2, 2)
(2, 1, 2, 1)
(2, 1, 1, 2)
(1, 2, 2, 1)
(1, 2, 1, 2)
(2, 2, 1, 1)

That works, but the program still has to calculate all the permutations that we are throwing out which is time consuming; at the most, a set will have 50 tiles which is 50! permutations. That’s  30414093201713378043612608166064768844377641568960512000000000000 permutations, which is really just an insane amount! So that won’t do.

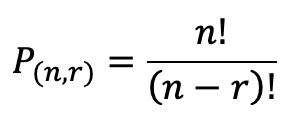
Well, we don’t need to know the permutations, just the amount of permutations! Let’s see if we can find a formula for that. The general formula that I found which researching permutations looks like this:

where n is the number of terms, and r is the number of terms you are choosing from your source pool. In this case, we are going to always use all the tiles in our base combination that we want to permute, so the number of permutations is just the factorial of the number of tiles. Hmm. That doesn’t really help since it doesn’t filter out any duplicates.

Perhaps if I researched a bit more, I could have found the proper formula for this situation. Rather than read more about permutations, I decided to take one of my base combinations and do some experiments to see if I could derive a formula for this situation. I took the last combination from my list and computed the number of unique permutations in order to see what my goal should be. (This operation took over 10 minutes)
>>> print len(set(itertools.permutations([3, 3, 4, 4, 4, 4, 4, 4, 4, 4, 4, 4, 4])))
78

I played around with factorials and found that for my 13 terms there would be 13!, or 6227020800, possible permutations. Since I knew I wanted the formula to result in 78, I divided the number of permutations by 78 and got 79833600. In theory, this number would be the denominator of my not-yet-existent formula. I tried grouping my 3s and 4s together; there are 2 and 11 respectively. I checked what 11! is and it turned out to be 39916800 which is exactly half of my target value for the denominator. And 2! (for the number of 3s) is 2. That seems pretty promising!

My hypothesis was that multiplying the factorials of the number of similar terms together and then dividing them into the number of possible permutations would yield my desired result. I tested it out on another combination and it worked out correctly, so I modified my program to perform this operation on each combination. I ran it and checked the answer, and it was correct!

And it only took .083 seconds! I’m pretty happy with the results. I’m sure a mathematician might have a more clever, direct way of solving this problem, however I think that since this solution is accurate and quick I can be proud of it. You can see the complete code on my github.


Affinity Software

Since Adobe’s move to subscription based software, I have stopped updating my Creative Suite. I had purchased CS3, and CS5. I was planning on getting CS6 or 7 when it came out, however after the release of CS6, Adobe axed the purchasable software and moved exclusively to the subscription model. Subscription makes sense in many settings (mostly professional). People who use the software daily for business, or people who have to continuously be using the most recent release can easily justify the cost. Paying the monthly sum is more affordable than paying the full purchase price and upgrading every year, or even every two years.

For me, CS5 was good enough that I was able to use it for a long time even though I knew that time was coming to an end. Each new release of Mac OS X was breaking features. WYSIWYG fonts broke around 10.7, using the color picker on raster images caused crashes around 10.8. I was willing to hobble along because the core functionality I required was there, and in all respects, and it generally worked very well.

Well, mostly well enough…

Over the years, I’ve looked for alternative programs. I looked at Sketch and Inkscape to replace Illustrator. I’ll be completely honest. I can’t stand InkScape. I appreciate that it is opensource, and applaud the amazing work that’s been put into it. I keep it installed and I resort to it from time to time because it works really well with SVGs, and it is also very scriptable which is a wonderful feature for some of my automated tasks. But when it comes to using it daily, I just can’t. The interface is too different from what I am habituated, and it’s not pretty or polished. For a long time it required X Windows/X Quartz to be installed, and didn’t present an integrated experience with the rest of the Mac.

To replace Photoshop, I purchased Pixelmator. It’s a great little program, and I really wanted to like it. It has a great OS X interface and is smooth and polished. I purchased it ages ago before giving up CS5 knowing that someday it would be inevitable. My goal was to use Pixelmator when my work called for photo editing, and not resort to Photoshop. Unfortunately, the workflow was sufficiently different from what I was accustomed that most of the time I ended up back in Photoshop. The differences in approach to UI caused just enough friction that I never used it enough to become proficient.

As for InDesign, I didn’t really have any affordable options that fit the bill. I have QuarkXpress, but don’t love it.

Finally a few years ago, I saw Affinity Photo being advertised at a reasonable price, and so I bought it and gave it a shot. (At this point Affinity Designer was on the cusp of being released). Affinity Photo felt much more familiar to me than Pixelmator off the bat. I found that I could slip right in and keep using it the way I was using Photoshop. Some of Affinity Photo’s idioms perplex me. At times I need to do some searching in order to complete a task that I could have done instantly in Photoshop. Aside from these little learning issues, it’s really pretty dang good. The differences that annoy me on the onset make sense once I see how they intended for the user to do that task.

My primary use case for Affinity Photo is doing photo touch ups and alterations. Usually this will involve multiple layers with masks, lens correction, and airbrushing/healing tools as well as the adjustment layers for color correction.

Since I had a positive experience with Affinity Photo, I decided to buy Affinity Designer sight-unseen. I was sold on it immediately. It too has some quirks, and I am still learning new things about it as I go, but for the most part, it’s been a great tool for everything I’ve needed it for. About a year ago I upgraded to Mojave and I did not bring CS5 with me. All of my professional work has been using Affinity Designer, and it’s been really great.


Adobe Illustrator Bezier Tool
Affinity Designer Bezier Tool

One of the great things about Affinity Designer that made me love it right away was the responsiveness. With Adobe Illustrator, when manipulating the handle of a bezier curve, a cyan colored outline of the curve will animate, but the actual curve you draw won’t present itself until you let go of the handle. I was so used to this being the case, that I never thought about it. In Affinity, the shapes animate in real time, which I think is fantastic.

The first task I used it for was creating an icon for an internal tool I was developing at work. The learning curve was not very steep and by the time I finished this icon, I felt pretty comfortable already.

The last piece of the puzzle was a publishing program to replace InDesign. I had a small book that I was working on with my sister, and thought that this would be a good opportunity to test out Affinity Publisher. It was in beta at the time, so I downloaded the beta and got straight to work.

Everything was going pretty well until I got the text for whole book roughly laid out, sans-graphics. I began throwing in graphics, saved it and exited. I revisited it the next day, and was unable to open my file! I checked the forums, and it turned out to be a known-issue relating to placing graphics on a page-master. A new Beta had already been released which resolved the issue. I was so relieved when I was able to open that file. That was the only issue I’ve encountered with Affinity Publisher.

I worked with my sister and finalized the design, exported it, and sent it for printing. We got the prints back, and everything looked perfect.

These three tools from Affinity integrate with each other really well, and I’ve been extremely happy with the value of the products, the features, the stability, and the polished interfaces. They feel cohesive as a product family, and they feel very at home on my Mac. I really can’t recommend these products enough.

© 2007-2015 Michael Caldwell